Monday, December 21, 2009

Serving...

I was just perusing some of the blogs kept up by couple missionaries serving in Guyana and saw a bunch of pictures of my parents! Thank-you Elder and Sister Collins (here's their blog btw: Collins Couple) for taking pictures with my parents in them and posting them!! When I talked to them yesterday all was well and they are staying very busy in Guyana keeping track of the missionaries serving there!
My mom is on the far right:
My dad and Elder LingrenMy mom:


My parents are the second couple from the left:


Monday, December 14, 2009

A pink princess shooting gun!

That is what Emma has been asking for Christmas. Neither N8 or I are "gun" people, but I figured out a way to somewhat accommodate this Christmas request! I made each of the kids (and N8 plus a few more!) mini marshmallow shooters. I had seen these floating around the internet and figured they should be too hard to put together.

The first thing you need to get, especially if your making more than one is a pvc cutter. I got it at Home Depot for about $15. This was by far the most expensive part of the entire project. But we will use them for future projects and it cut the cutting time down significantly. If you're just making one, see if you can get Home Depot to cut your PVC. A hack saw will work too, the cuts just aren't as clean.
Then you need 1/2 inch PVC. For the simple shooters I made I needed a total of about 23 inches of PVC: 3- 4 inch, 2- 3 inch 1- 5 inch. You also need 2 elbows, 2 tees, 2 caps & 2 couplers. And here's the layout for your shooter:

Then put it all together. DO NOT GLUE IT! this shooter works by blowing through it, you are going to want a way to wash it out occasionally!

My next step was to make it a 'pink princess shooting gun'! So I got myself a can a pink spray paint. Remove the coupler at the barrel of the shooter. That way you won't be putting your mouth on spray paint. Paint away! Then for an added flare I added names and stars with vinyl. I painted the boys shooter black-

When I wrap these up I will include a ziploc of mini marshmallows! To shoot, just put a mini marshmallow in the top and blow! N8 was trying them out and could easily shoot a marshmallow across the room! The total cost of the PVC and connectors for 1 shooters was $2.16! Pretty sweet Christmas present! I think Mo's favorite part will be eating the marshmallows!
BCD Show and tell

I also wanted to add a few pictures from Mo's birthday. We went pretty simple. We ordered pizza and had one friends family come over~


Saturday, December 12, 2009

Who's got a beard that's long and white?

Santa's got a beard that's long and white! This week Santa came to preschool. Emma asked for a doll house. Over the last couple of weeks though the main thing she keeps asking for is a "pink princess shooting gun"-seriously where does she come up with these things! We'll have more on that though in my next post! So here she is with Santa~

and Mo got a picture with him too~

Now we enter the last week of school before Christmas break! I haven't started goodie plates and haven't quite gotten in the mood to start. We'll see if anything happens in that department!

Friday, December 11, 2009

A year of Mo!!

Today my little guy turns 2!! It's really crazy to think that he is that old!
So here's a year of Mo in review!


Happy Birthday Mo!!

Sunday, December 6, 2009

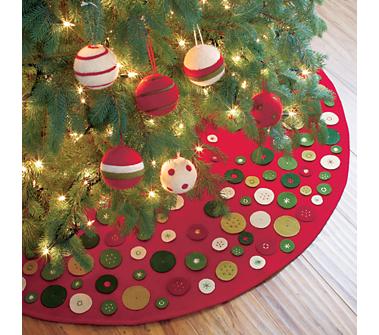
Christmas Craft: No sew felt tree skirt & decorating the tree!

On November 30 I tried to convince N8 that we could put our tree up, but he convinced me that we needed to wait until December! But what that did is give me a sometime to get/find/make a new tree skirt! I have a tree skirt, but I'm not ashamed to say-it's ugly. Well, maybe that's harsh, someone else might like it, but I don't. So I happened upon this blog:Little Birdie Secrets and her embroidered tree skirt.
I think her tree skirt is super cute! Then I found this one at Crate and Barrel!

Now if I had $80 to spend on a tree skirt this would be the one I would buy! And if I had 5 hours to spend I would have tried me hand at the one from Little Birdie Secrets! But, since I didn't have $80 or 5 hours, I took both ideas and simplified to make a no sew-purely cutting and hot glueing felt tree skirt! It's not a cute or fancy, but it took me about an hour and $15!

I followed the tutorial linking in Little Birdie for cutting out the initial felt circle. I purchased my red felt at Wal-mart (only because I have no other options for buying felt! Otherwise I would for sure go to Joanns!).

So here's the beginning process. make a square of felt and fold it into quarters. Then either using a string and chalk or a sharpie and measuring tape (I didn't want to take the time to find chalk!) measure out the curve for your circle. Then carefully cut and then do another smaller one for the center circle. Lastly find center and cut up to the middle. This is the basic circle for the tree skirt!

Next I took 3 colors of felt-red, green & white and traced and cut various sizes of circles.

Then I layed out the circle and groupings of 3 and red,green & white buttons in grouping of 3 randomly around the tree skirt. Then I started hot gluing them on!

For a finishing touch, I took 6 inch peices of red and green ribbon and looped and glued them. Then evenly spaced them in alternating colors around the tree skirt!


Here it is just after i finished it:


Here it is under the tree:


This year I decided that our Christmas tree needed to match a little better! And since I know Mo will decorate and undecorate (or pull off and put on ornaments) I went with cheap plastic ornaments. Only red, green, silver and white-plus any sentimental favorites. I think the tree looks so much better!!

I also made some beaded snowflakes using wire snowflake forms from Oriental Trading and red, green, white and silver beads!


BCD Show and tell

Tuesday, December 1, 2009

Christmas Craft: Wooden Snowmen

After my sister and I made our Snowman Candy bars we had the idea that we should make some that we could use year after year! So I went over to Home Depot and rifled through the cheap wood bin to find some 2x4's that we could turn into snowmen! $1.50 later I had all the w We wanted to make a "family" of snowmen. I made 8 inch tall parents and 6 inch tall kids. We then sanded the wood to get any rough spots off and painted them all white.

After they were completely dry we lightly sanded the edges to make them look a little more rustic and did a coat of very, very light watered down brown & black paint and immediately wiped it off. This gave them an aged look.

Then we measured around the wood and cut pieces of fleece that length and about 10 inches wide and sewed up the side. This is to form the hat for the snowman.

After that we made the cuts for the top of the hat. Make small cuts about 2 inches long into the fleece. When done tie a piece of ribbon or yarn tightly around to form the top of the hat. Also cut a piece of fleece about 1 inch wide by 15 inches long for the scarf. Tie around the middle of the snowman and snip the ends to make the scarf.

Then glue on buttons, googly eyes and a fun foam carrot nose!!

My sister added colored buttons behind the googly eyes to match the eye color of her children. It's a fun addition to personalize the snowmen. We also talked about making a pair of glasses out of wire for her daughter that wears glasses! Neither of us chose Christmas fleece for our snowmen so we could keep them up throughout the entire winter.

This week I plan on getting up all of my Christmas decorations so my wooden snowmen will find their home this week!

BCD Show and tell