I missed having Sunday afternoons! Now that we're back to having 9am church we have all this time. Sometimes that's not a good thing-crazy out of control children! But yesterday Emma and I worked on and finished a Valentine's day craft! It was nice. I hadn't crafted for a while. Now I'm back in the mood and ready for more! Here's what we made: So it means I finally posted back on my craft blog: ldscraftproject.com! I hope that more post will be coming shortly!
With all of my sewing project I always end up with scraps. My sister passed on a link to a tutorial that i thought would be a great use for some of my scraps. Over at Make It and Love It there is a tutorial for a diaper & wipes case/cover. I gave it a shot, and here are my results.
Here is the first diaper case I made (I followed the given size and decided it was HUGE for a newborn. Mo's big diapers have tons of room).
So, I decided to make another smaller version that fits a newborn size diaper (and a size 1) just right. I also matched the wipes case to this cover: Instead of Velcro I opted for snaps.
While I was checking out other links on this site I came across a Toddler Bag handle and gave it a try too. I didn't use any fusible web, I just tucked a piece of felt in the handle end. Hopefully this will help Mo stay with me when I can't hold his hand.
Lastly, I had a few strips of coordinating fabric and decided to put together another simple blanket for the little guy. While in Phoenix I had picked up the coordinating backing fabric.
I still have tons of scraps. I could make a few dozen more toddler bag handles and diapers and wipes covers but I'll probably stop where I'm at!
Summer is in full swing and I've been trying to get some things done here before the real heat sets in!!
First, my mom is redoing some of the pictures that are up in her house and is now going to have a "grandkid" wall. So we needed to take a nice recent picture of the kids. On Sunday morning we headed out front to take our shots. We also started swimming lessons. Bud and Emma are both in the same class and have been doing a good job. I think they've both improved a lot and I hope that more swimming throughout the rest of the summer will progress them even further. Mo gets to play in the wading pool during their lessons and is enjoying some water time. I've also been working on a few projects myself. For sewing, I finished a blanket for the new little man and used a piece of the extra fabric to make a small "changing pad". I sewed a piece of shower curtain (they have them at the dollartree!) in the middle to make it "leak proof"!! I've also been trying out more "applique". I found some terry cloth at Walmart and thought I'd give bibs a try. I'm very happy with how these turned out:
My latest project is on that I've been wanting to get done for a while. I apologize for those that were interested in doing it with me. I decided to start it and just couldn't stop! I'm very happy with how or "tree hands" turned out and the kids had a lot of fun helping get them put together. I decided to add their names in vinyl and a quote above to tie it all together. (Them empty frame will get filled in August when our little guy joins the family) Here's where you can find the original idea and instructions: At Second Street I used flat canvas that came in a pack of 3 from Joanns (don't forget our 40% coupon). I painted them tan. I used 3 different green fabrics for the leaves and a brown one for the hands. It all got modge podged down and sat overnight to dry. I purchased frames at Walmart and took the glass out.
Yesterday I found another neat project that I think I might have to try. Have you every done any quilling? I haven't, but this looks so neat!! What an awesome gift it would make! Check it out here: Craftasical
So I'm feeling like I'm in the home stretch of pregnancy (about 10 weeks to go) and am finally getting to some of the sewing projects that I planned to do. I've made many carseat covers, but I still hadn't made one for myself. A few weeks ago I went down to Lancaster and picked out some fun fabric and this week I finally got around to making it. I made one minor change from the previous covers I have made-snaps!!
My first efforts resulted in a minor snafu! I put my two tabs on opposite of each other! But with quick use of my seam ripper the problem was remedied! Here's the final product: I also made matching/coordinating burp clothes, binky clips & a onesie tie! I'm really happy with how they all turned out and now will move onto some other projects I have in mind!!
One last image to share. Our two kitties Pichi & Paccha are funny. N8 snapped this picture the other night of the two of them snuggled up with each other!!
So, I decided to try a making a bib with a necktie applique on it. I happened to have a pack of inexpensive terry cloth/vinyl backed bibs. I got the pack of 13 for $5. Here's how it turned out. A few tips/concerns~ ~If you happen to use the vinyl backed bibs, be careful with ironing on the fabric/wonder-under. Mine got a little melted, but is still ok. ~Be sure to measure your bib and tie to see if it will fit ok. ~Pick a fabric that will easily wash up with the bib.
This weekend my sister and her family popped in for Friday afternoon and Saturday! We always have such a great time visiting and playing games. Here are the adults and teens during a brief break from playing nerts!! The kids were enjoying a movie. We had so much fun that this was only one of 3 pictures I took this weekend. The other two were of food!!
I love finding fun simple new recipes to try out, especially when they're for dessert!! I recently subscribed to Southern Living I obviously don't live in the South, but I enjoy the decorating ideas and there are some really yummy recipes!! This one is for Banana Bread Cobbler!! It is super duper yummy and easy to make!!
Preheat oven to 375°. Whisk together flour and next 2 ingredients just until blended; whisk in melted butter. Pour batter into a lightly greased 11- x 7-inch baking dish. Top with banana slices, and sprinkle with Streusel Topping.
Ingredients for Struesel
3/4 cup firmly packed light brown sugar
1/2 cup self-rising flour
1/2 cup butter, softened
1 cup uncooked regular oats
1/2 cup chopped pecans
Preparation
Stir together brown sugar, flour, and butter until crumbly, using a fork. Stir in oats and pecans.
Bake at 375° for 40 to 45 minutes or until golden brown and bubbly. Serve with ice cream. (I left out the pecans and used 1 1/2 cups of oats)
Crafting is an outlet for me. I'm not very good at sewing, but I enjoy it. I enjoy starting a project and finishing it. Most of the crafts I do are not time consuming, so I see a quick result! Recently a friend of mine saw the pictures of one of the car seat canopy's and asked if I wanted to try selling them at her hair salon. I decided to give it a shot! It gives my an excuse to find super cute fabric and sew more!! I also decided to make a nursing cover attachment. That way you can just clip your car seat canopy on and keep your self covered up while nursing. It's just a ribbon with 2 suspender clips sewn on either end.
So we seem to be having somewhat of a baby boom here and I really like having a homemade gift to give a new mom. When I saw carseat conopies (or tent) popping up online I loved the idea. A blanket that is attached to your carseat! I can't even count the number of times my blanket fell off the carseat as I walked into the grocery store or Wal-mart.
So I'v been busy making carseat canopies for the new babies that I know of coming up. Right now most of the ladies don't know what they're having yet, so I'm making a little reserve!
My first one I made was given to Oliver. The ones that I saw were a little different that what I made though. I decided to change it up a bit and do ribbon ties for instead of velcro tabs. But after watching Ricky and Kim tie and re-tie their ribbons I have changed my plan and am following the trend and doing velrco tabs. Here is Oliver's with the now added velcro tabs: Then I made one from Evan and for my future little nephew that's due to make his appearance tomorrow! Sara and Carol, If you read this and would like, I can sew you some velcro tabs to add onto your canopy. So now on all version 2.0 canopy's we have velcro tabs to attach to the carseat!
Here's one from online that's pretty much like what I'm making, and she has a really good tutorial if you're wanting to make you own. They are super simple and depending on how much you spend on fabric, they're a really reasonable gift. I love picking out fabric, finding cute coordinating colors!
Here's are some that I have already made and ready!
This one is flannel on top and cotton on bottom: This one is flannel on top and bottom: This is lighter weight and is cotton on top and bottom: And this one is corduroy on top and waffle knit on top: On some of them I added some buttons to jazz up the tabs. I am not a seamstress by any means. I have a hard time even sewing a straight line, but for some reason sewing is relaxing and rewarding for me! Now I need to find some more fun fabric!!
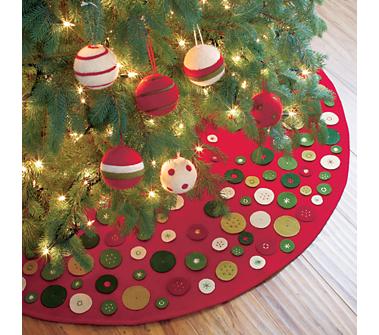
On November 30 I tried to convince N8 that we could put our tree up, but he convinced me that we needed to wait until December! But what that did is give me a sometime to get/find/make a new tree skirt! I have a tree skirt, but I'm not ashamed to say-it's ugly. Well, maybe that's harsh, someone else might like it, but I don't. So I happened upon this blog:Little Birdie Secrets and her embroidered tree skirt. I think her tree skirt is super cute! Then I found this one at Crate and Barrel! Now if I had $80 to spend on a tree skirt this would be the one I would buy! And if I had 5 hours to spend I would have tried me hand at the one from Little Birdie Secrets! But, since I didn't have $80 or 5 hours, I took both ideas and simplified to make a no sew-purely cutting and hot glueing felt tree skirt! It's not a cute or fancy, but it took me about an hour and $15!
I followed the tutorial linking in Little Birdie for cutting out the initial felt circle. I purchased my red felt at Wal-mart (only because I have no other options for buying felt! Otherwise I would for sure go to Joanns!).
So here's the beginning process. make a square of felt and fold it into quarters. Then either using a string and chalk or a sharpie and measuring tape (I didn't want to take the time to find chalk!) measure out the curve for your circle. Then carefully cut and then do another smaller one for the center circle. Lastly find center and cut up to the middle. This is the basic circle for the tree skirt! Next I took 3 colors of felt-red, green & white and traced and cut various sizes of circles. Then I layed out the circle and groupings of 3 and red,green & white buttons in grouping of 3 randomly around the tree skirt. Then I started hot gluing them on! For a finishing touch, I took 6 inch peices of red and green ribbon and looped and glued them. Then evenly spaced them in alternating colors around the tree skirt!
Here it is just after i finished it:
Here it is under the tree:
This year I decided that our Christmas tree needed to match a little better! And since I know Mo will decorate and undecorate (or pull off and put on ornaments) I went with cheap plastic ornaments. Only red, green, silver and white-plus any sentimental favorites. I think the tree looks so much better!!
I also made some beaded snowflakes using wire snowflake forms from Oriental Trading and red, green, white and silver beads!