Sunday, December 6, 2009

Christmas Craft: No sew felt tree skirt & decorating the tree!

On November 30 I tried to convince N8 that we could put our tree up, but he convinced me that we needed to wait until December! But what that did is give me a sometime to get/find/make a new tree skirt! I have a tree skirt, but I'm not ashamed to say-it's ugly. Well, maybe that's harsh, someone else might like it, but I don't. So I happened upon this blog:Little Birdie Secrets and her embroidered tree skirt.
I think her tree skirt is super cute! Then I found this one at Crate and Barrel!
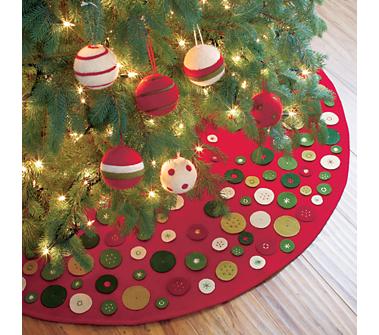
Now if I had $80 to spend on a tree skirt this would be the one I would buy! And if I had 5 hours to spend I would have tried me hand at the one from Little Birdie Secrets! But, since I didn't have $80 or 5 hours, I took both ideas and simplified to make a no sew-purely cutting and hot glueing felt tree skirt! It's not a cute or fancy, but it took me about an hour and $15!

I followed the tutorial linking in Little Birdie for cutting out the initial felt circle. I purchased my red felt at Wal-mart (only because I have no other options for buying felt! Otherwise I would for sure go to Joanns!).

So here's the beginning process. make a square of felt and fold it into quarters. Then either using a string and chalk or a sharpie and measuring tape (I didn't want to take the time to find chalk!) measure out the curve for your circle. Then carefully cut and then do another smaller one for the center circle. Lastly find center and cut up to the middle. This is the basic circle for the tree skirt!

Next I took 3 colors of felt-red, green & white and traced and cut various sizes of circles.

Then I layed out the circle and groupings of 3 and red,green & white buttons in grouping of 3 randomly around the tree skirt. Then I started hot gluing them on!

For a finishing touch, I took 6 inch peices of red and green ribbon and looped and glued them. Then evenly spaced them in alternating colors around the tree skirt!


Here it is just after i finished it:


Here it is under the tree:


This year I decided that our Christmas tree needed to match a little better! And since I know Mo will decorate and undecorate (or pull off and put on ornaments) I went with cheap plastic ornaments. Only red, green, silver and white-plus any sentimental favorites. I think the tree looks so much better!!

I also made some beaded snowflakes using wire snowflake forms from Oriental Trading and red, green, white and silver beads!



BCD Show and tell

Tuesday, December 1, 2009

Christmas Craft: Wooden Snowmen

After my sister and I made our Snowman Candy bars we had the idea that we should make some that we could use year after year! So I went over to Home Depot and rifled through the cheap wood bin to find some 2x4's that we could turn into snowmen! $1.50 later I had all the w We wanted to make a "family" of snowmen. I made 8 inch tall parents and 6 inch tall kids. We then sanded the wood to get any rough spots off and painted them all white.

After they were completely dry we lightly sanded the edges to make them look a little more rustic and did a coat of very, very light watered down brown & black paint and immediately wiped it off. This gave them an aged look.

Then we measured around the wood and cut pieces of fleece that length and about 10 inches wide and sewed up the side. This is to form the hat for the snowman.

After that we made the cuts for the top of the hat. Make small cuts about 2 inches long into the fleece. When done tie a piece of ribbon or yarn tightly around to form the top of the hat. Also cut a piece of fleece about 1 inch wide by 15 inches long for the scarf. Tie around the middle of the snowman and snip the ends to make the scarf.

Then glue on buttons, googly eyes and a fun foam carrot nose!!

My sister added colored buttons behind the googly eyes to match the eye color of her children. It's a fun addition to personalize the snowmen. We also talked about making a pair of glasses out of wire for her daughter that wears glasses! Neither of us chose Christmas fleece for our snowmen so we could keep them up throughout the entire winter.

This week I plan on getting up all of my Christmas decorations so my wooden snowmen will find their home this week!

BCD Show and tell

Sunday, November 29, 2009

Time to give thanks...

What a week we had!! I don't think I'm ready for a new one to begin. We began our Thanksgiving week at the happiest place on earth-Disneyland!! It had been about 3 years since our last visit and we were excited to be there. We went with my sisters family and her in-laws. It was a blast! Thanksgiving week is a pretty busy time, but with our expert guides and our superb use of fast-passes we got in everything we wanted to go on!!

This time Bud was tall enough to go on pretty much everything. And since he didn't know any better we could get him on everything at least once!! I can't wait until we get to go back.

On Thanksgiving morning our local track club held a turkey trot. N8, 2 of my nephews and my niece all ran. They did awesome!!


On Friday we of course did all of our Black Friday shopping! My sister and I were at Wal-mart at 4:30am to find all of our deals. Later that day she and I did a fun craft (which I will be posting on tomorrow or Tuesday) and the rest of the group went to Fossil Falls:

On Saturday we were ready and set to go sand-boarding at the Olancha sand dunes. But when we awoke to the sound of rain (it hadn't rained here since February!!) we thought the days plans would be thrown out the window. But as we made a birthday breakfast for my brother in law, the clouds began to clear and we packed up to go. As we drove up we encountered more rain, but were optimistic. Our optimism quickly left as we arrived at the dunes only to find extreme wind and cold. It was in the low 40's and there were winds at least a sustained 50mph! It was insane, but an adventure to say the least. This was the best picture of the entire thing:

Doesn't my nephew look "cool" as we all cower in the wind!!!

So we all trekked out the the dunes, then all trekked back to the car and drove onto Lone Pine where we ate our picnic lunch in the car!! Then we drove on up to Manzanar, a former Japanese Internment Camp from WWII. It was really interesting and made the day turn out much much better!

Now begins another week and lots of loads of laundry, putting up Christmas decorations and recouping!!

Tuesday, November 17, 2009

Christmas Craft: Snowman Candy Bars

While visiting my sister we attended an activity where they were making crafts to be donated and sold. The proceeds are going to a family shelter. It was a lot of fun to see the different crafts being made! One caught our eye though and we had to stop on our way home from the activity to buy supplies to make some ourselves!! They were Snowman Candy Bars! It's a perfect gift for a Visiting teacher, school teacher, friend. My sister was making them for her teenagers to give to friends at school!

So here's what you need: a large candy bar, brown paper to wrap, tape, glue, googly eyes, buttons, orange felt or fun foam, a short piece of ribbon or yarn and fleece.

First we started my measuring the width of the candy bar and doubling it. Then we cut lengths of felt that were 1/3 of a yard wide.

Next sew up the side (luckily fleece is pretty forgiving and you want it to be tight around the candy bar:

Then wrap your candy bar in brown paper (or scrapbook paper or wrapping paper-whatever you have!)

Next you want to fold up one end of your fleece tube about 1 inch and slide it onto one end of the wrapped candy bar:

Then cut thin strips about 1 1/2 inches long and 1/2 wide around the open end of the fleece tube:

Then tie a tight knot around the cut pieces of fleece and fluff:

Now glue on googly eyes and small felt or fun foam nose and 3 buttons:

Then take a thin strip of fleece (about 3/4 inch wide by about 15 inches long) and tie around between the buttons and the nose:

Then cut thin 1 inch strips on each end:


It's done!! We made quite a few of these. I think they would be fun to make using microwave popcorn or the movie theater boxes of candy too! Whatever you find for a good deal! It might even be fun to make different size and have a whole Snowman Candy Bar family!

While visiting my sister I saw her kids chore charts. They're just a simple list for each day of the week and they cross the item off as they complete the tasks. I think this week I might try making a vinyl version of this for myself. I need some chore accountability and doing it in vinyl makes it so much more fun!


Monday, November 16, 2009

F-A-M-I-L-Y!

We spent the last few days with some of our family! My niece was baptized on Saturday and we were so happy that we could be there to be a part of that day! Since we had Wednesday off due to Veteran's day and N8 had Friday of for Flex, we took Bud out of school Thursday and Friday and took off on our trip Wednesday morning. On Thursday morning we got some new family pictures taken!! I love having a current family picture!

On Friday we drove over to San Francisco and went to the zoo. The kids of course loved it and the animals cooperated by being visible in the cages!

After the zoo we stopped at the Golden Gate Bridge to take a few pictures. While we were there my brother in law convinced N8 he should run across the bridge and we would drive over and meet him on the other side! N8 was up for the challenge and did a great job!

On Saturday we got to go to my nephews robotics competition. Their team built a lego robot and it completes different tasks by following a computer program the kids write. Bud loved watching it. I hope that he can be involved in something like that when he gets older!

Then we had my nieces baptism. There were 3 children getting baptized. Everything went smoothly and she is now a member of the Church of Jesus Christ of Latter Day Saints!!

We love visiting family and had a great time. We're looking forward to seeing them again this next week at the Happiest Place on Earth (aka: Disneyland!!!)


Tuesday, November 10, 2009

Christmas Craft: Marble Magnets

The first time I made marble magnets was at least 2 years ago. The entire concept of personalizing magnets with your own pictures and paper was a great idea to me. We even did it at a Super Saturday for HFPE. Over the last 2 years I've randomly made more and then it dwindled away. Then last week I decided to make them again after reading in a few different places that you can use diamond glaze to adhere the paper to the marble! Yet another use for a great product. Now this doesn't diminish my love for modge podge it still can't be beat for many, many applications!

So, go out to your Dollartree and buy yourself some glass marble accents. The dollartree is seriously the best place to find them. They might to be perfectly clear or round, but a $1 for about 25-you can't beat a price like that!

Print some pictures or grab your favorite scrapbook paper and cut out to the size you need (they're ususally 1 1/8 inches or so)

Put a small amount (smaller than a dime) of diamond glaze on the back of the marble.

Place your picture on and press evenly until the diamond glaze has evenly coated the picture and marble.

Let it dry and glue on a magnet. I prefer usuing E6000 to glue my magnets on and I buy my rare earth magnets here: (http://www.dealextreme.com/products.dx/category.1105) they have free shipping, but it does take a couple of weeks to get to you.

I think they are much clearer and easier to make than with the Modge Podge. It's a fun way to have seasonal magnets or family pictures that have a purpose. It's also an easy homemade gift!

I also wanted to add a picture of the finish Baby's ABC book we made at the baby shower a couple of weeks ago. After all of the letters were finished, I laminated the pages and had it bound at Staples:

I also finished up our family birthday calendar. Now I need to get them all mailed out!


I hope everyone has a great Veteran's Day and weekend! We're headed on a little family trip for a baptism-Go Bridget!! I'm super excited to see family, get family pictures taken, go the temple, go to the zoo, do some shopping and play some games!!